Cisco Webex
出自KMU Wiki
| 在2021年7月30日 (五) 14:14所做的修訂版本 (編輯) Ykk (對話 | 貢獻) ←上一個 |
當前修訂版本 (2021年7月30日 (五) 17:20) (編輯) (撤銷) Ykk (對話 | 貢獻) (→如何取得Webex的會議網址) |
||
| (56個中途的修訂版本沒有顯示。) | |||
| 第1行: | 第1行: | ||
| + | ==Cisco Webex 開啟新會議或排程會議功能介紹 == | ||
| + | 1.Webex註冊之後,網頁版跟桌面應用程式版本,<br/> | ||
| + | 都可以點選<font color="red">左側「會議」</font>或<font color="red">「30」</font>的圖示,來開始會議。 | ||
| + | <br><br/> | ||
| + | 網頁版只能點選<font color="red">「排定會議」</font>,再將時間調整到最接近現在的時間, | ||
| + | [[Image:00-1.jpg|800px ]] | ||
| + | <br/><br/> | ||
| + | 來準備立即的會議,或安排未來排程的會議。<font color="red">(會議主題與密碼可以自訂。)</font> | ||
| + | <br/> | ||
| + | [[Image:webex-00-3.jpg||800px ]] | ||
| + | <br><br/> | ||
| + | 網頁版設定好後,可以按下<font color="red">「開始」</font>,來準備啟始會議。 | ||
| + | [[Image:webex-00-3.jpg||800px ]] | ||
| + | <br><br/> | ||
| + | 安裝應用程式的話,可以點選<font color="red">「開始會議」(立即會議)</font>,或者<font color="red">「排定會議」(起始未來會議)</font> | ||
| + | [[Image:webex-00-4.jpg||800px ]] | ||
| + | <br><br/> | ||
| + | 應用程式版本的<font color="red">【排定會議】</font>,可以<font color="red">設定一次性會議連結或者個人專屬會議室連結</font>,完成後按下<font color="red">「排定」</font>。 | ||
| + | <br> | ||
| + | [[Image:Webex-20.jpg||800px ]] | ||
| + | <br><br/> | ||
| + | 點選<font color="red">「開始會議」,會是開啟一個新的會議</font>,而回到會議列表,<font color="red">旁邊的綠色按鈕,點擊是將排程會議立即開啟</font>。 | ||
| + | [[Image:Webex-21.jpg||800px ]] | ||
| + | <br/><br/> | ||
| - | : | + | ==排定會議時,可以填入EMail邀請人員開會。 == |
| - | + | <br/> | |
| + | 網頁版,排定會議時,<font color="red">可以輸入受邀人員的EMail進行邀請</font>。 | ||
| + | [[Image:webex-02.jpg||800px ]] | ||
| <br><br/> | <br><br/> | ||
| - | + | 應用程式版本,排定會議時,<font color="red">亦可以輸入受邀人員的EMail進行邀請</font>。 | |
| + | [[Image:webex-22.jpg||800px ]] | ||
| + | <br><br/> | ||
| + | |||
| + | ==如何取得Webex的會議網址 == | ||
| + | (1)網頁版的<font color="red">「排定會議」</font>,設定完成之後,點選<font color="red">「開始」</font>之後,會看到<font color="red">「會議資訊」</font>。<br/> | ||
| + | [[Image:webex-22-1.jpg||800px]] | ||
| + | <br/><br/> | ||
| + | (2)此時也會另開新視窗,<font color="red">直接進入會議</font>,開始會議之後,<font color="red">點選左上角的小i,即可再看到會議資訊的連結</font>。 | ||
| <br/> | <br/> | ||
| - | + | [[Image:webex-23.jpg||800px]] | |
| + | <br/><br/> | ||
| + | (3)但如果是<font color="red">Webex的Windows應用程式</font>,都要先<font color="red">點綠色按鈕來開始並加入會議,才能看到「會議連結」</font>。 | ||
| + | 。<br/> | ||
| + | [[Image:webex-25.jpg||800px]] | ||
| + | <br/><br/> | ||
| + | (4)按下<font color="red">「上方的功能列」</font>點選<font color="red">「會議資訊」</font>,即可看到<font color="red">會議的URL。</font>,再複製給其他與繪者。<br/> | ||
| + | [[Image:webex-24.jpg||800px]] | ||
| + | <br/><br/> | ||
| + | |||
| + | ==網頁版,僅可以分享螢幕畫面,<font color="red">無法錄影跟新建「民意調查」</font> == | ||
| + | 1.點選<font color="red">「開始」</font>之後,正式會議要開始之前,可以選擇<font color="red">「關閉麥克風」</font>跟<font color="red">「關閉視訊」</font>,再按下<font color="red">「開始會議」</font>。<br/> | ||
| + | [[Image:webex-03.jpg||800px]] | ||
| + | <br/><br/> | ||
| + | 2.網頁版記得要<font color="red">同意或「Allow」取用「麥克風」跟「攝影機」</font>。<br/> | ||
| + | [[Image:webex-04.jpg||800px]] | ||
| + | <br/><br/> | ||
| + | 3.點選<font color="red">「共用」</font>,可以分享<font color="red">「螢幕」或「應用程式」</font>。<br/> | ||
| + | [[Image:webex-05.jpg||800px]] | ||
| + | <br><br/> | ||
| + | 4.<font color="red">「民意調查」</font>或<font color="red">「問與答」</font>功能,在網頁版Webex,功能無法完整使用,<font color="red">建議下載Webex的Windows或Mac應用程式。</font><br/> | ||
| + | [[Image:webex-06 .jpg||800px]] | ||
| + | <br><br/> | ||
| + | 5.網頁版的Webex,無法使用<font color="red">「錄影」</font>功能。<br/> | ||
| + | [[Image:webex-07.jpg||800px]] | ||
| <br><br/> | <br><br/> | ||
| + | ==應用程式版本Webex,<font color="blue">可以分享螢幕、錄製畫面、民意調查與問答</font> == | ||
| + | 應用程式版本,可以<font color="red">共用「螢幕畫面」、「應用程式畫面」,跟「錄製Webex執行時的畫面」</font>。 | ||
| + | <br/> | ||
| + | [[Image:webex-08 .jpg||800px]] | ||
| + | <br/><br/> | ||
| + | ==民意調查與投票<font color="red">(限定應用程式版本新建)</font>== | ||
| + | (1)選擇<font color="red">檢視功能表列「檢視」-->「面板」-->「管理面板」</font><br/> | ||
| + | [[Image:webex-09.jpg || 800px]] | ||
| + | <br/><br/> | ||
| + | (2)選擇<font color="red">「民意調查」</font>,按下<font color="red">中間的「新增」</font>。<br/> | ||
| + | [[Image:webex-10.jpg || 800px]] | ||
| + | <br/><br/> | ||
| + | (3)右側的<font color="red">「目前面板」</font>,會出現按下<font color="red">「民意調查」</font>,按下<font color="red">「確定」</font>。<br/> | ||
| + | [[Image:webex-11.jpg || 800px]] | ||
| + | <br/><br/> | ||
| + | (4)選擇題目類型,總共有<font color="red">「選擇題-單個答案、選擇題-多個答案、簡答」可供選擇</font>,確定後按下<font color="red">「新增」</font>。<br/> | ||
| + | (5)在上方<font color="red">逐一輸入題目內容</font>。<br/> | ||
| + | [[Image:webex-12.jpg || 800px]] | ||
| + | <br/><br/> | ||
| + | (6)往下到選擇<font color="red">「答案」可供選擇</font>,在上面<font color="red">「逐一輸入答案選項」</font>。<br/> | ||
| + | (7)可針對單一答案選取後,點選<font color="red">「標記為正確選項」</font>。<br/> | ||
| + | (8)<font color="red">「記錄個人回應」</font>,後續才能看到投票內容。<br/> | ||
| + | [[Image:webex-13.jpg || 800px]] | ||
| + | <br/><br/> | ||
| + | (9)如果投票有時間限制,可點選<font color="red">「選項」</font>,加以設定時間。<br/> | ||
| + | (10)最後完成之後,按下<font color="red">「開啟民意調查」</font>。<br/> | ||
| + | [[Image:webex-14.jpg || 800px]] | ||
| + | <br/><br/> | ||
| + | (11)完成之後畫面如下,測試過,訪客可以開啟會議連結,登入亦可以看到<font color="red">「民意調查」</font>,進而做到<font color="red">「投票選舉」</font>。<br/> | ||
| + | [[Image:webex-15.jpg || 800px]]<br/><br/> | ||
| + | (12)訪客可正常投票、提交。<br/> | ||
| + | [[Image:webex-16.jpg || 800px]] | ||
| + | <br/><br/> | ||
| + | (13)請先按<font color="red">綠色框的「關閉民意調查」</font>,可以另外<br/> | ||
| + | (14)勾選是否跟<font color="red">參與者分享「最終民意調查結果」或者他個人投票的「個人結果」</font><br/> | ||
| + | (15)上方的<font color="red">「下載」圖示</font>,可以<font color="red">下載這個「民意調查」的範本</font>,跟將<font color="red">「民意調查結果」另存為txt文字檔案下載</font>。 | ||
| + | [[Image:webex-18.jpg || 800px]] | ||
| + | <br/><br/> | ||
| + | (14)下載的<font color="red">「民意調查結果」</font>。<br/> | ||
| + | [[Image:webex-19.jpg || 800px]] | ||
| + | <br/><br/> | ||
| [[Category:資訊處]] [[Category:圖書資訊處]] [[Category:資訊服務]] | [[Category:資訊處]] [[Category:圖書資訊處]] [[Category:資訊服務]] | ||
當前修訂版本
目錄 |
[編輯] Cisco Webex 開啟新會議或排程會議功能介紹
1.Webex註冊之後,網頁版跟桌面應用程式版本,
都可以點選左側「會議」或「30」的圖示,來開始會議。
網頁版只能點選「排定會議」,再將時間調整到最接近現在的時間,
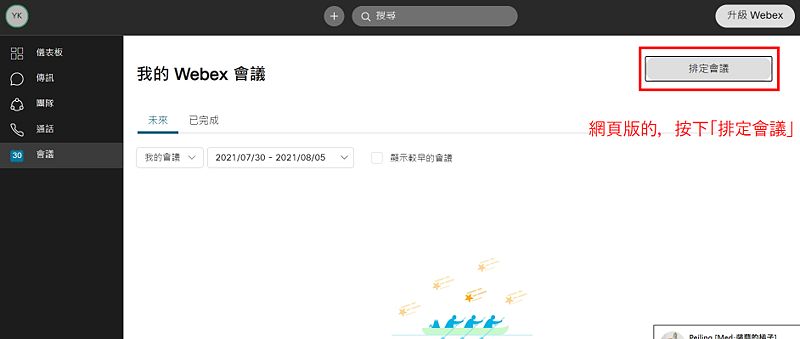
來準備立即的會議,或安排未來排程的會議。(會議主題與密碼可以自訂。)
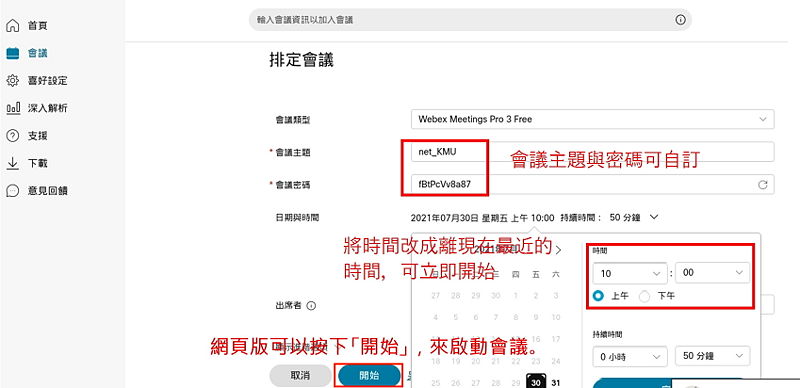
網頁版設定好後,可以按下「開始」,來準備啟始會議。

安裝應用程式的話,可以點選「開始會議」(立即會議),或者「排定會議」(起始未來會議)
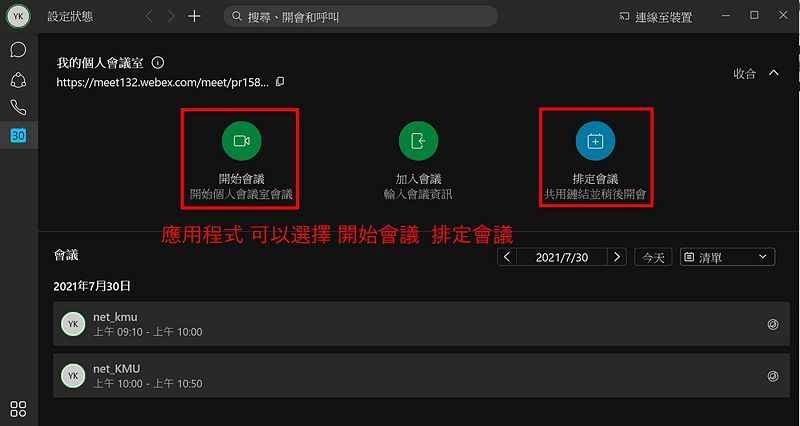
應用程式版本的【排定會議】,可以設定一次性會議連結或者個人專屬會議室連結,完成後按下「排定」。
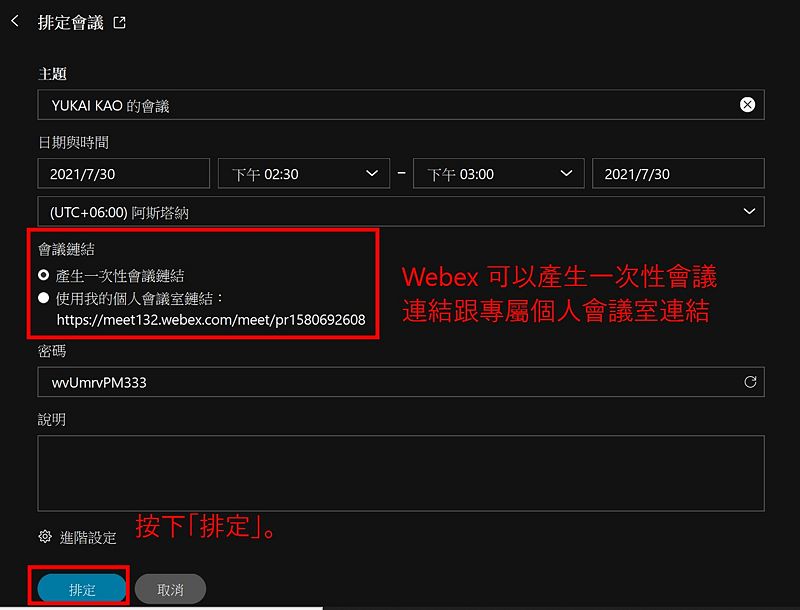
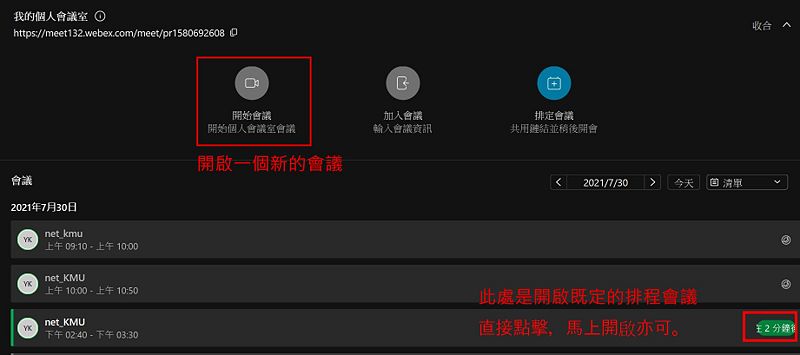
點選「開始會議」,會是開啟一個新的會議,而回到會議列表,旁邊的綠色按鈕,點擊是將排程會議立即開啟。
[編輯] 排定會議時,可以填入EMail邀請人員開會。
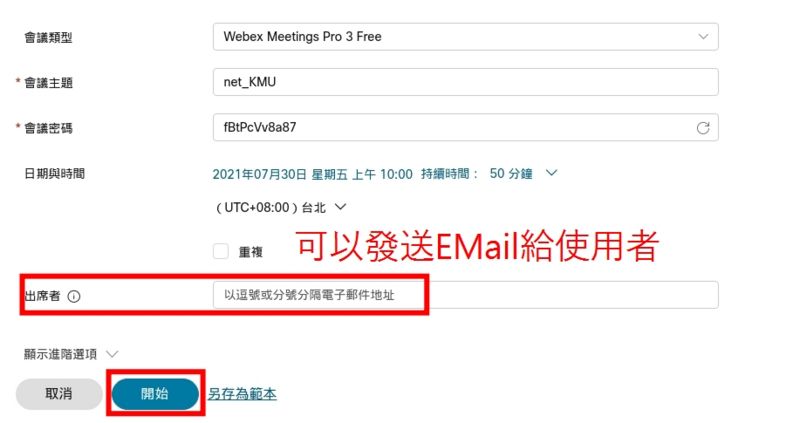
網頁版,排定會議時,可以輸入受邀人員的EMail進行邀請。
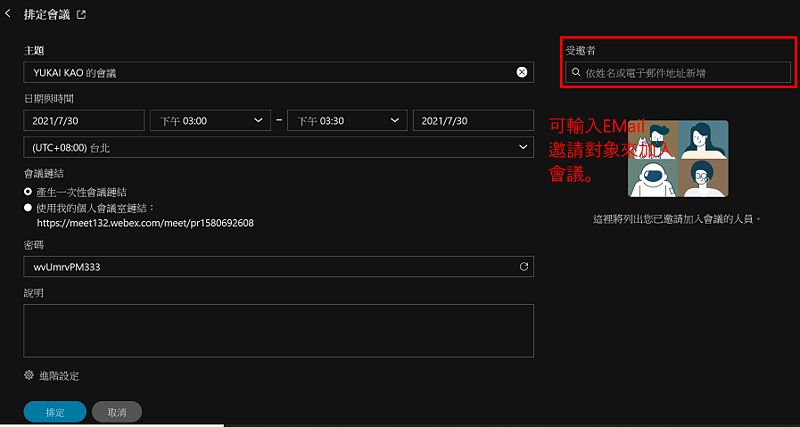
應用程式版本,排定會議時,亦可以輸入受邀人員的EMail進行邀請。
[編輯] 如何取得Webex的會議網址
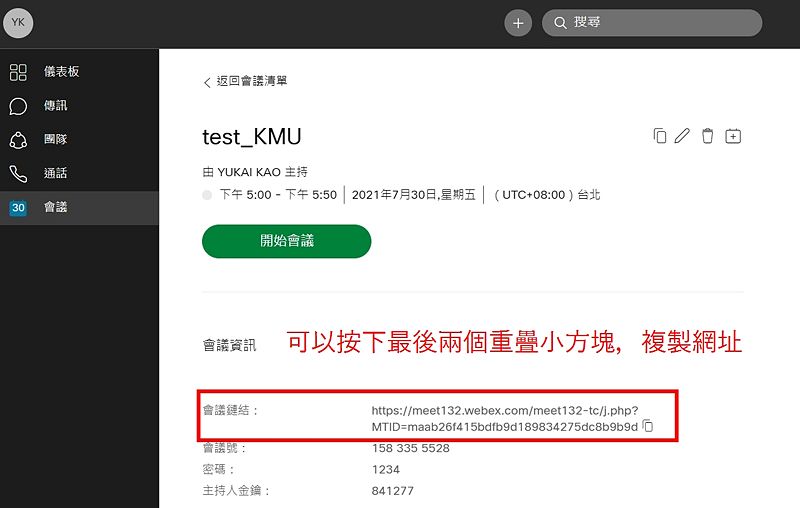
(1)網頁版的「排定會議」,設定完成之後,點選「開始」之後,會看到「會議資訊」。
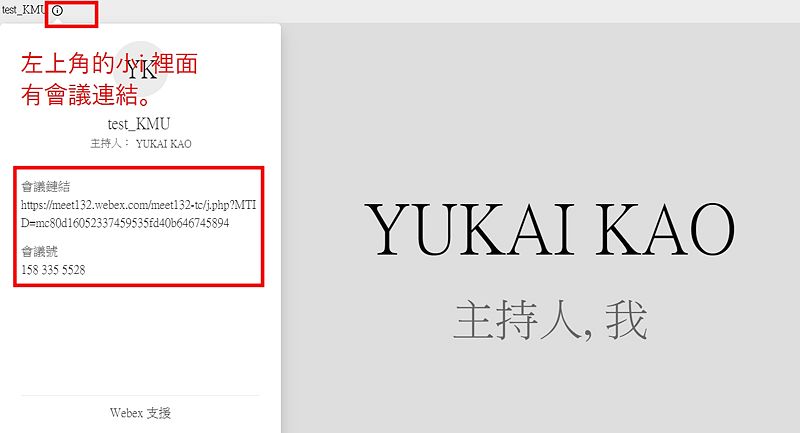
(2)此時也會另開新視窗,直接進入會議,開始會議之後,點選左上角的小i,即可再看到會議資訊的連結。
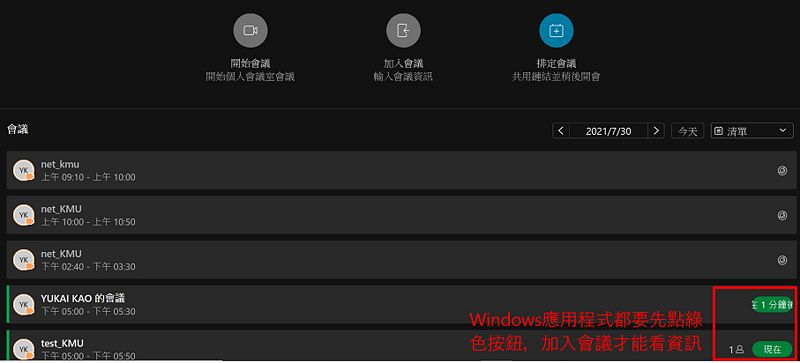
(3)但如果是Webex的Windows應用程式,都要先點綠色按鈕來開始並加入會議,才能看到「會議連結」。
。
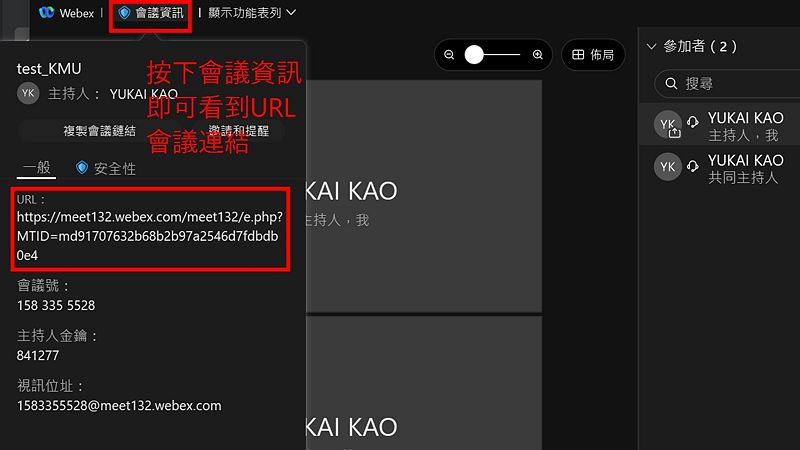
(4)按下「上方的功能列」點選「會議資訊」,即可看到會議的URL。,再複製給其他與繪者。
[編輯] 網頁版,僅可以分享螢幕畫面,無法錄影跟新建「民意調查」
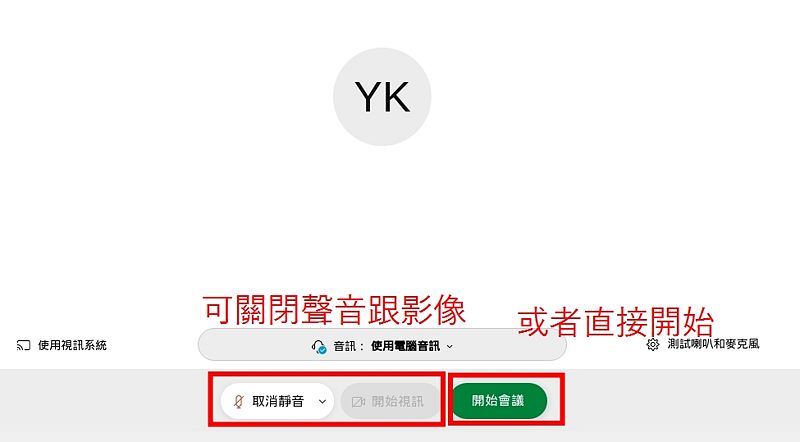
1.點選「開始」之後,正式會議要開始之前,可以選擇「關閉麥克風」跟「關閉視訊」,再按下「開始會議」。
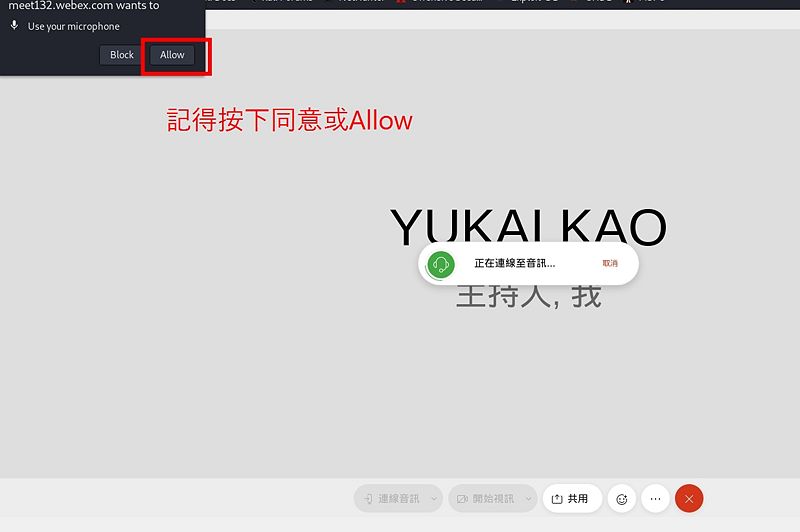
2.網頁版記得要同意或「Allow」取用「麥克風」跟「攝影機」。
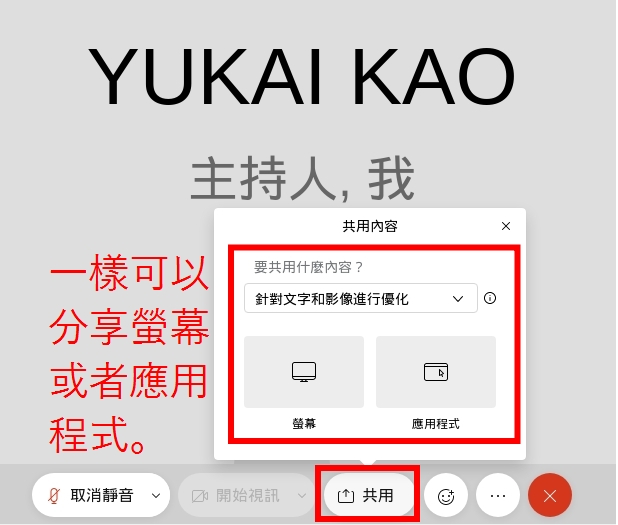
3.點選「共用」,可以分享「螢幕」或「應用程式」。
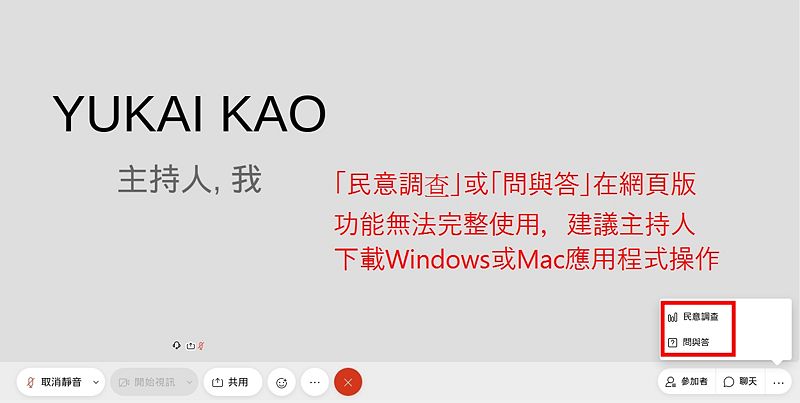
4.「民意調查」或「問與答」功能,在網頁版Webex,功能無法完整使用,建議下載Webex的Windows或Mac應用程式。
5.網頁版的Webex,無法使用「錄影」功能。

[編輯] 應用程式版本Webex,可以分享螢幕、錄製畫面、民意調查與問答
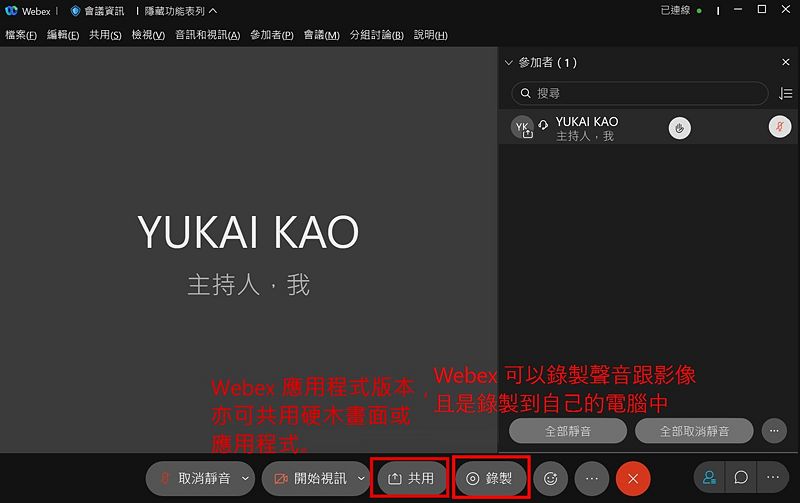
應用程式版本,可以共用「螢幕畫面」、「應用程式畫面」,跟「錄製Webex執行時的畫面」。
[編輯] 民意調查與投票(限定應用程式版本新建)
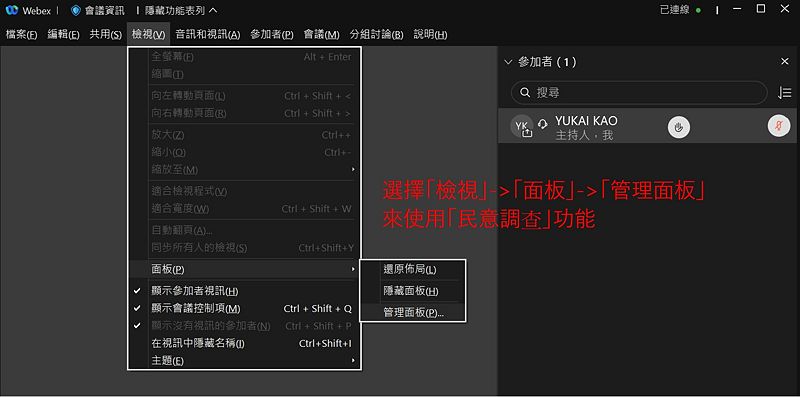
(1)選擇檢視功能表列「檢視」-->「面板」-->「管理面板」
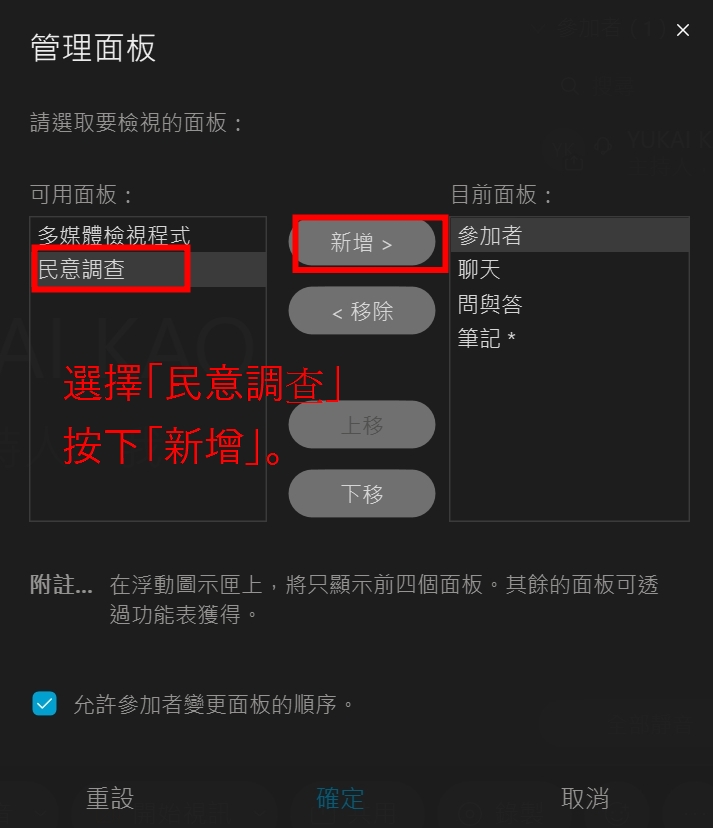
(2)選擇「民意調查」,按下中間的「新增」。
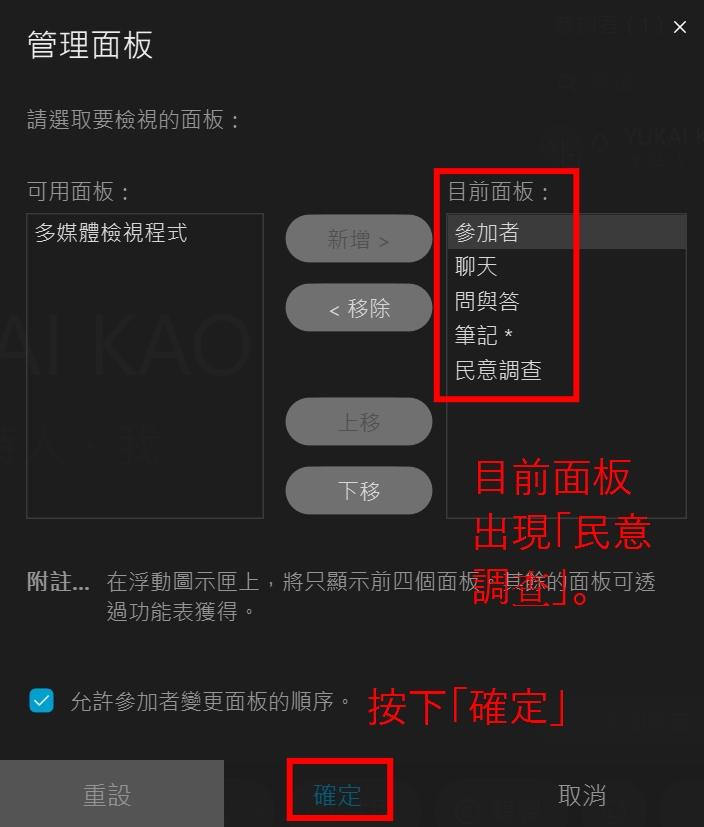
(3)右側的「目前面板」,會出現按下「民意調查」,按下「確定」。
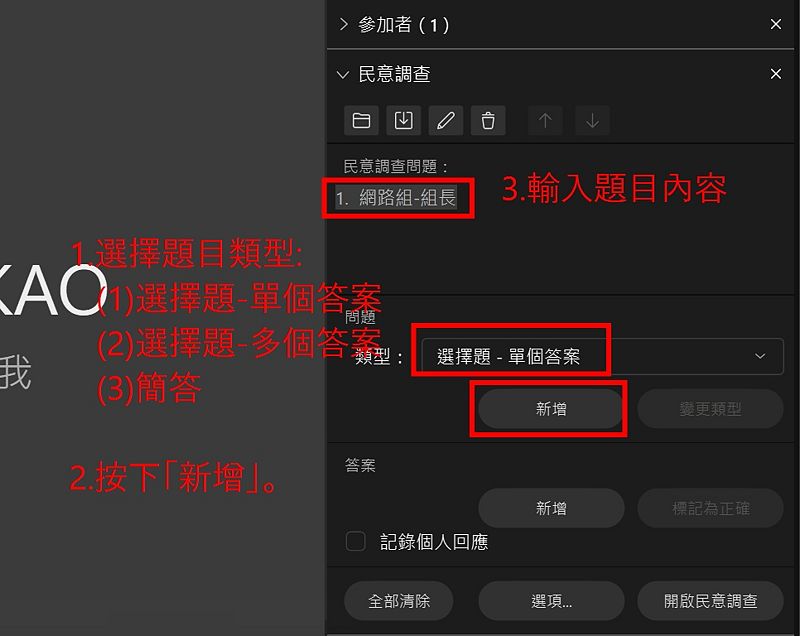
(4)選擇題目類型,總共有「選擇題-單個答案、選擇題-多個答案、簡答」可供選擇,確定後按下「新增」。
(5)在上方逐一輸入題目內容。
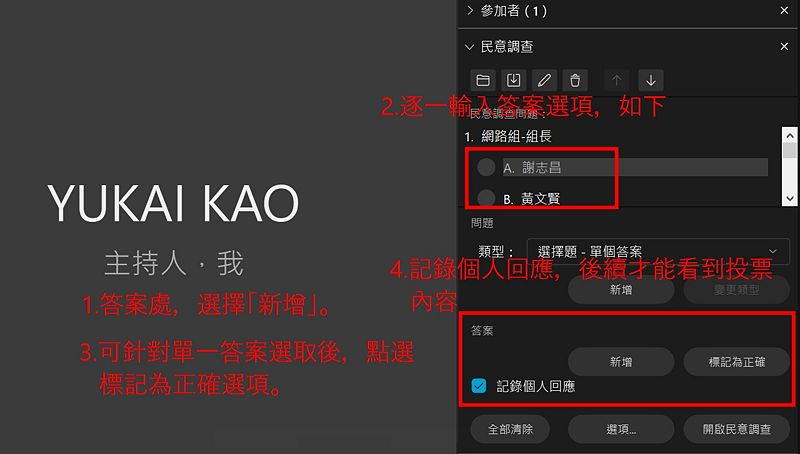
(6)往下到選擇「答案」可供選擇,在上面「逐一輸入答案選項」。
(7)可針對單一答案選取後,點選「標記為正確選項」。
(8)「記錄個人回應」,後續才能看到投票內容。
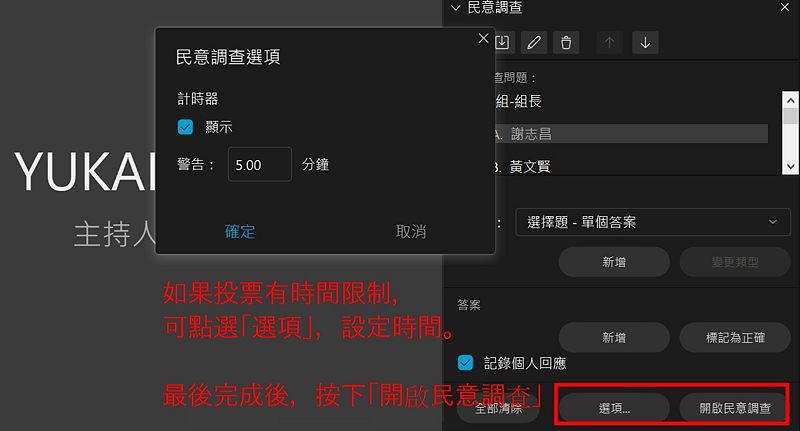
(9)如果投票有時間限制,可點選「選項」,加以設定時間。
(10)最後完成之後,按下「開啟民意調查」。
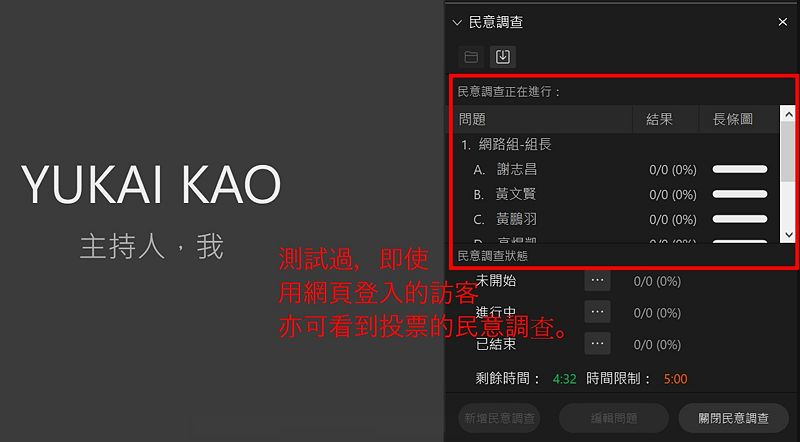
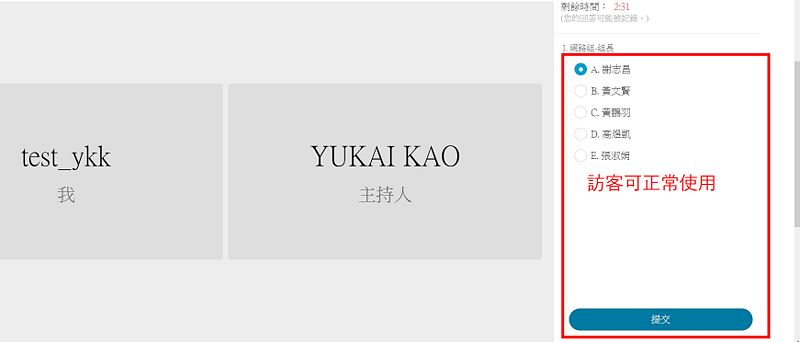
(11)完成之後畫面如下,測試過,訪客可以開啟會議連結,登入亦可以看到「民意調查」,進而做到「投票選舉」。
(12)訪客可正常投票、提交。
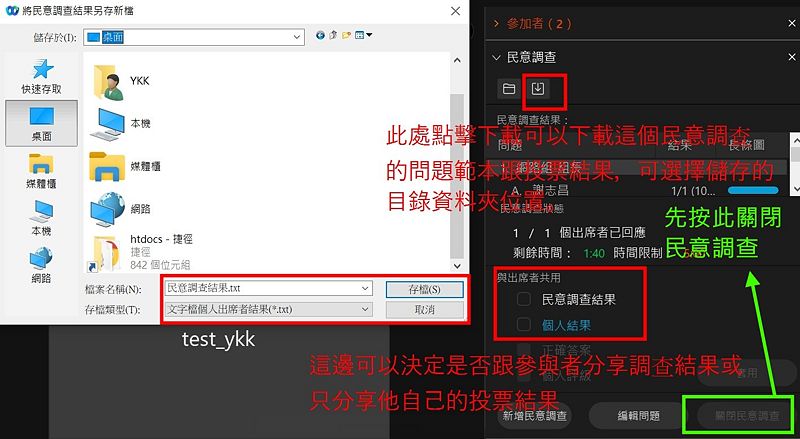
(13)請先按綠色框的「關閉民意調查」,可以另外
(14)勾選是否跟參與者分享「最終民意調查結果」或者他個人投票的「個人結果」
(15)上方的「下載」圖示,可以下載這個「民意調查」的範本,跟將「民意調查結果」另存為txt文字檔案下載。
