After password changed
出自KMU Wiki
(修訂版本間差異)
| 在2020年12月18日 (五) 16:42所做的修訂版本 (編輯) Cch (對話 | 貢獻) (→本校常用圖書資訊服務所對應之帳號及密碼) ←上一個 |
當前修訂版本 (2021年1月6日 (三) 13:30) (編輯) (撤銷) Cch (對話 | 貢獻) |
||
| (39個中途的修訂版本沒有顯示。) | |||
| 第1行: | 第1行: | ||
| - | 密碼變更後之注意事項 | + | <h1>密碼變更後之注意事項</h1> |
| + | |||
| + | =本校常用圖書資訊服務所對應之帳號及密碼= | ||
| + | |||
| + | * 密碼變更後之注意事項 | ||
| 提醒您,變更電子郵件/校務資訊系統密碼之後, | 提醒您,變更電子郵件/校務資訊系統密碼之後, | ||
| 第8行: | 第12行: | ||
| 也要記得用新密碼重新登入。 | 也要記得用新密碼重新登入。 | ||
| - | |||
| - | =本校常用圖書資訊服務所對應之帳號及密碼= | ||
| * 本校圖資處所提供資訊服務,常用的有兩個密碼︰ | * 本校圖資處所提供資訊服務,常用的有兩個密碼︰ | ||
| 第16行: | 第18行: | ||
| *: 只要記得 (A) 主要密碼就可以重設次要密碼。 | *: 只要記得 (A) 主要密碼就可以重設次要密碼。 | ||
| + | * 各項服務所需輸入之帳號與密碼,詳情請參考︰ | ||
| + | *: '''學生''' https://olis.kmu.edu.tw/index.php/zh-TW/information-services/guide/newstudent | ||
| + | *: '''教職員''' https://olis.kmu.edu.tw/index.php/zh-TW/information-services/guide/newstaff | ||
| + | |||
| + | * 簡要對照表 | ||
| {| border=1 | {| border=1 | ||
| - | | 密碼類別 || | + | | 密碼類別 <br> || 適用之系統 |
| |- | |- | ||
| - | | (A) 主要密碼︰<br>'''電子郵件/校務資訊系統密碼''' <br> || (1)[https://webmail.kmu.edu.tw 電子郵件] (2)[https://wac.kmu.edu.tw 校務資訊系統] (3)[https://fs.kmu.edu.tw 授權軟體下載] (4)[https://toread.kmu.edu.tw/toread/opac 圖書館館藏查詢系統] (5)iKMU Wi-Fi <br>(6)i高醫App | + | | (A) 主要密碼︰<br>'''電子郵件/校務資訊系統密碼''' <br> || (1)[https://webmail.kmu.edu.tw 電子郵件]<br> (2)[https://wac.kmu.edu.tw 校務資訊系統]<br> (3)[https://fs.kmu.edu.tw 授權軟體下載] <br>(4)[https://toread.kmu.edu.tw/toread/opac 圖書館館藏查詢系統]<br> (5) [http://wiki.kmu.edu.tw/index.php/Kmuwifi iKMU Wi-Fi]<br> (6) [https://olis.kmu.edu.tw/index.php/zh-TW/cloud-services/ikmuapp i高醫App] |
| |- | |- | ||
| - | | (B) 次要密碼︰<br>'''數位學習平台密碼''' <br> || (1)[http://wm.kmu.edu.tw 數位學習平台] (2)[http://er.kmu.edu.tw 電子資源查詢] | + | | (B) 次要密碼︰<br>'''數位學習平台密碼''' <br> || (1)[http://wm.kmu.edu.tw 數位學習平台]<br> (2)[http://er.kmu.edu.tw 電子資源查詢] |
| |} | |} | ||
| - | + | =如果忘記密碼= | |
| - | + | ||
| - | + | ||
| - | + | * 若您已在 MyKMU https://my.kmu.edu.tw 註冊過備用信箱並完成驗證,可使用 MyKMU 的忘記密碼功能。 | |
| - | + | * 若您未在 MyKMU 註冊過備用信箱,本人可於上班時間攜帶本校身份證件至國際學術研究大樓6F圖書資訊處,由工作人員協助處理,或與圖書資訊處網路技術組連絡 (信箱︰net@kmu.edu.tw,校內分機︰2184)。 | |
| - | 以 Gmail 為例︰ | ||
| - | + | =忘記密碼(有設定備用信箱)(圖文版)= | |
| - | + | <h3><font color="black"><b>1.到 [https://my.kmu.edu.tw https://my.kmu.edu.tw]</b></font><font color="red"><b>點選下方的【忘記密碼】。</b></font><br/><br/> | |
| + | <font color="red"><b> 註:為有註冊備用電子郵件信箱時使用。</b></font><br/><br/> | ||
| - | 針對您設定的本校帳戶 '''修改資訊''' | ||
| - | + | :[[Image:Forgetpw_01.png|550px]]<br/><br/> | |
| - | * 若您已在 MyKMU https://my.kmu.edu.tw 註冊過備用信箱並完成驗證,可使用 MyKMU 的忘記密碼功能。 | ||
| - | + | <font color="black"><b>2.輸入自己的</b></font><font color="red"><b>【職號/學號】。</b></font><font color="black"><b>按下</b></font><font color="red"><b>【送出】。</b></font><br/><br/> | |
| + | |||
| + | :[[Image:Forgetpw_02.png|550px]]<br/><br/> | ||
| + | |||
| + | |||
| + | <font color="black"><b>3.系統會發出</b></font><font color="red"><b>【重設密碼的通知信】。</b></font><br/><br/> | ||
| + | |||
| + | :[[Image:Forgetpw_03.png|550px]]<br/><br/> | ||
| + | |||
| + | <font color="black"><b>4.點擊</b></font><font color="red"><b>【驗證連結】。</b></font><br/><br/> | ||
| + | |||
| + | :[[Image:Forgetpw_04.png|550px]]<br/><br/> | ||
| + | |||
| + | <font color="black"><b>5.輸入</b></font><font color="red"><b>【要重新設定的校務資訊系統密碼】。</b></font><br/><br/> | ||
| + | <font color="black"><b> 再次輸入</b></font><font color="red"><b>【重設的校務資訊系統密碼】。</b></font><br/><br/> | ||
| + | <font color="red"><b> 最後按下</b></font><font color="red"><b>【送出】。</b></font><br/><br/> | ||
| + | |||
| + | :[[Image:Forgetpw_05.png|550px]]<br/><br/> | ||
| + | |||
| + | |||
| + | <font color="black"><b>6.確認</b></font><font color="red"><b>【變更密碼成功】,【可用新密碼登入】。</b></font><br/><br/> | ||
| + | |||
| + | :[[Image:Forgetpw_06.png|550px]]<br/><br/> | ||
| + | |||
| + | |||
| + | </h3> | ||
| + | |||
| + | =如何更新已記憶的相關密碼 (文字版)= | ||
| + | |||
| + | # 更新 i高醫App 曾記憶過該密碼 | ||
| + | #: 登出再重新登入,輸入新的電子郵件/校務資訊系統密碼 | ||
| + | # 更新校外信箱 (設定收取本校信箱) 曾記憶過該密碼 | ||
| + | #: 以 Gmail 為例︰ | ||
| + | #: 右上 '''設定(齒輪)''' -> '''查看所有設定''' -> | ||
| + | #: '''帳戶''' -> '''查看其他帳戶的郵件:''' -> | ||
| + | #: 針對您設定的本校帳戶 '''修改資訊''' | ||
| + | #: 輸入新的電子郵件/校務資訊系統密碼 | ||
| + | |||
| + | |||
| + | =如何更新Gmail(Gap)中高醫大信箱之密碼= | ||
| + | |||
| + | |||
| + | <h3><font color="black"><b>1.點選Gmail內部頁面</b></font><font color="red"><b>右上角的【齒輪】</b></font><br/><br/> | ||
| + | <font color="black"><b> 接著點</b></font><font color="red"><b>【查看所有設定】。</b></font><br/><br/> | ||
| + | |||
| + | :[[Image:Gmailedit_01.png|550px]]<br/><br/> | ||
| + | |||
| + | |||
| + | <font color="black"><b>2.接下來進入</b></font><font color="red"><b>【設定】</b></font><font color="black"><b>的畫面</b></font><br/><br/> | ||
| + | <font color="black"><b> ,Gmail:點選</b></font><font color="red"><b>【帳戶和匯入】</b></font><br/><br/> | ||
| + | <font color="red"><b> Gap信箱:點選</b></font><font color="red"><b>【帳戶】</b></font><br/><br/> | ||
| + | |||
| + | :[[Image:Gmailedit_02.png|550px]]<br/><br/> | ||
| + | |||
| + | |||
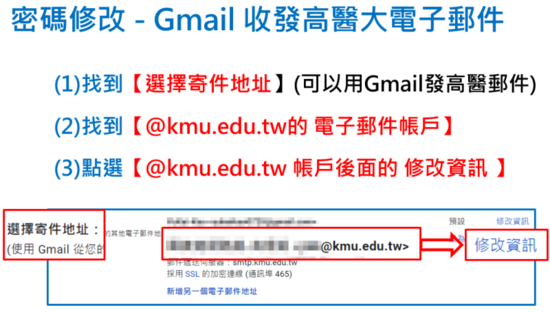
| + | <font color="black"><b>3.找到</b></font><font color="red"><b>【選擇寄件地址】。</b></font><br/><br/> | ||
| + | <font color="black"><b> 接著找</b></font><font color="red"><b>【@kmu.edu.tw的電子郵件帳戶】</b></font><br/><br/> | ||
| + | <font color="red"><b> 點選:</b></font><font color="red"><b>【@kmu.edu.tw帳戶後面的修改資訊】</b></font><br/><br/> | ||
| + | |||
| + | :[[Image:Gmailedit_03.png|550px]]<br/><br/> | ||
| + | |||
| + | <font color="black"><b>4.下圖左,直接點選</b></font><font color="red"><b>【下一步】。</b></font><br/><br/> | ||
| + | <font color="black"><b> 輸入</b></font><font color="red"><b>【剛剛設定新的校務資訊系統/電子郵件密碼】</b></font><br/><br/> | ||
| + | <font color="red"><b> 點選:</b></font><font color="red"><b>【儲存變更】</b></font><br/><br/> | ||
| + | |||
| + | :[[Image:Gmailedit_04.png|550px]]<br/><br/> | ||
| + | |||
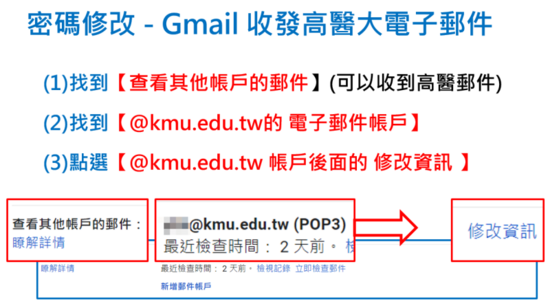
| + | <font color="black"><b>5.找到</b></font><font color="red"><b>【查看其他帳戶的郵件】。</b></font><br/><br/> | ||
| + | <font color="black"><b> 接著找</b></font><font color="red"><b>【@kmu.edu.tw的電子郵件帳戶】</b></font><br/><br/> | ||
| + | <font color="red"><b> 點選:</b></font><font color="red"><b>【@kmu.edu.tw帳戶後面的修改資訊】</b></font><br/><br/> | ||
| + | |||
| + | :[[Image:Gmailedit_05.png|550px]]<br/><br/> | ||
| + | |||
| + | |||
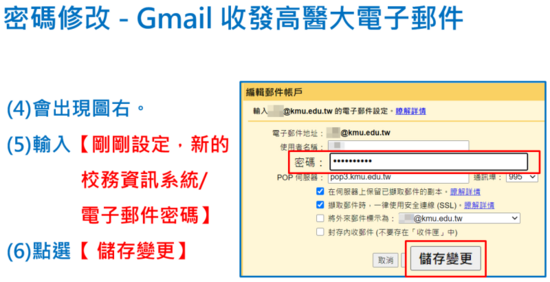
| + | <font color="black"><b>6.會出現</b></font><font color="red"><b>【圖右的視窗】。</b></font><br/><br/> | ||
| + | <font color="black"><b> 輸入</b></font><font color="red"><b>【剛剛設定新的校務資訊系統/電子郵件密碼】</b></font><br/><br/> | ||
| + | <font color="red"><b> 點選:</b></font><font color="red"><b>【儲存變更】</b></font><br/><br/> | ||
| + | |||
| + | :[[Image:Gmailedit_06.png|550px]]<br/><br/> | ||
| + | |||
| + | |||
| + | </h3> | ||
| + | |||
| + | =如何更新Outlook 2010~2019 之高醫大信箱密碼= | ||
| + | |||
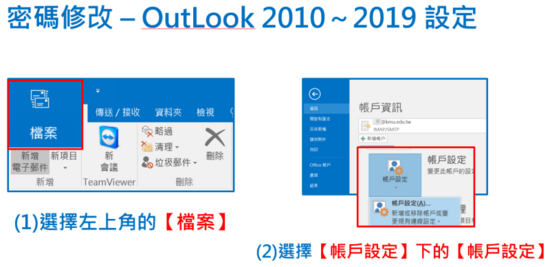
| + | <h3><font color="black"><b>1.選擇左上角</b></font><font color="red"><b>【檔案】</b></font><br/><br/> | ||
| + | <font color="black"><b> 選擇</b></font><font color="red"><b>【帳戶設定下的帳戶設定】。</b></font><br/><br/> | ||
| + | |||
| + | :[[Image:Outlookedit_01.png|550px]]<br/><br/> | ||
| + | |||
| + | |||
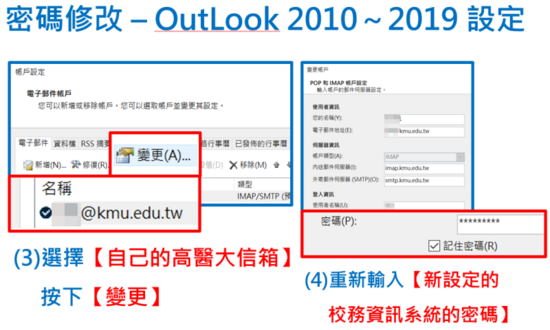
| + | <font color="black"><b>2.選擇</b></font><font color="red"><b>【自己的高醫大信箱】</b></font><font color="black"><b>按下</b></font><font color="red"><b>【變更】</b></font><br/><br/> | ||
| + | <font color="black"><b> 重新輸入</b></font><font color="red"><b>【新設定的校務資訊系統的密碼】</b></font><br/><br/> | ||
| + | |||
| + | |||
| + | :[[Image:Outlookedit_02.png |550px]]<br/><br/> | ||
| + | |||
| + | |||
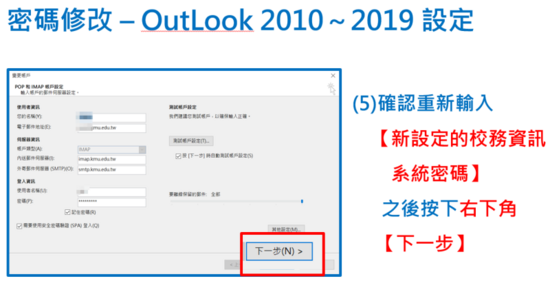
| + | <font color="black"><b>3.確認重新輸入</b></font><font color="red"><b>【新設定的校務資訊系統密碼】。</b></font><br/><br/> | ||
| + | <font color="black"><b> 之後按下</b></font><font color="red"><b>【右下角的下一步】</b></font><br/><br/> | ||
| + | |||
| + | :[[Image:Outlookedit_03.png|550px]]<br/><br/> | ||
| + | |||
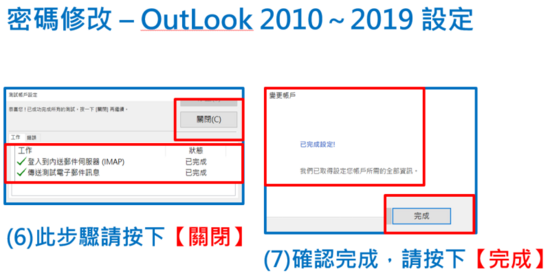
| + | <font color="black"><b>4.下圖左,可點選</b></font><font color="red"><b>【關閉】。</b></font><br/><br/> | ||
| + | <font color="black"><b> 確認完成,請按下</b></font><font color="red"><b>【完成】。</b></font><br/><br/> | ||
| + | |||
| + | :[[Image:Outlookedit_04.png|550px]]<br/><br/> | ||
| + | |||
| + | |||
| + | </h3> | ||
| + | |||
| + | =如何更新Windows Live Mail之高醫大信箱密碼= | ||
| + | |||
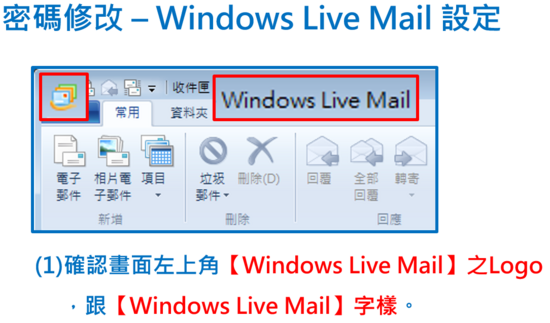
| + | <h3><font color="black"><b>1.確認左上角的</b></font><font color="red"><b>Windows Live Mail】之Logo</b></font><font color="black"><b>,跟</b></font><br/><br/> | ||
| + | <font color="red"><b> 【Windows Live Mail】字樣</b></font><br/><br/> | ||
| + | <font color="red"><b> 確認是使用Windows Live Mail。</b></font><br/><br/> | ||
| + | :[[Image:LiveMailedit_01.png|550px]]<br/><br/> | ||
| + | |||
| + | |||
| + | <font color="black"><b>2.選擇高醫大信箱的帳戶</b></font><font color="black"><b>,按</b></font><font color="red"><b>【右鍵】,選擇【內容】。</b></font><br/><br/> | ||
| + | |||
| + | :[[Image:LiveMailedit_02.png |550px]]<br/><br/> | ||
| + | |||
| + | |||
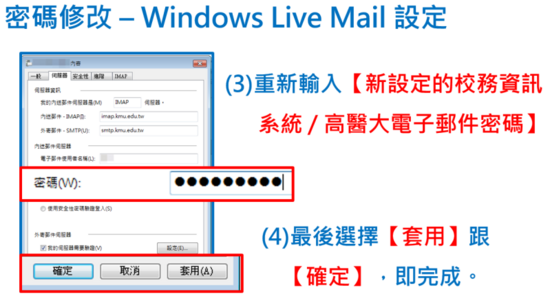
| + | <font color="black"><b>3.重新輸入</b></font><font color="red"><b>【新設定的校務資訊系統密碼】。</b></font><br/><br/> | ||
| + | <font color="black"><b> 最後選擇</b></font><font color="red"><b>【套用】</b></font><font color="black"><b>跟</b></font><font color="red"><b>【確定】</b></font><font color="black"><b>,即完成。</b></font><br/><br/> | ||
| + | |||
| + | :[[Image:LiveMailedit_03.png|550px]]<br/><br/> | ||
| + | |||
| + | |||
| + | |||
| + | </h3> | ||
| + | |||
| + | =如何更新i高醫(iKMU)App之高醫大信箱密碼= | ||
| + | |||
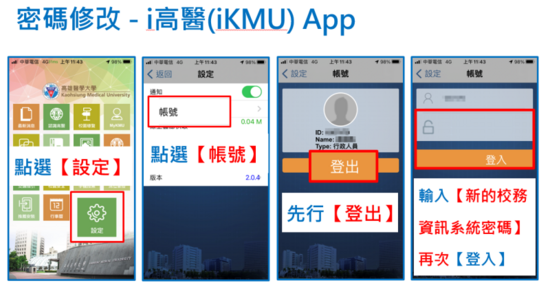
| + | <h3><font color="black"><b>1.點選:</b></font><font color="red"><b>【設定】</b></font> <font color="black"><b>2.點選:</b></font><font color="red"><b>【帳號】</b></font><br><br> | ||
| + | <font color="black"><b>3.先行點選</b></font><font color="red"><b>【登出】</b></font> | ||
| + | <br/><br/> | ||
| + | <font color="black"><b>4.輸入</b></font><font color="red"><b>【新的校務資訊系統密碼】</b></font><font color="black"><b>,再次</b></font><font color="red"><b>【登入】。</b></font><br/><br/> | ||
| + | |||
| + | :[[Image:IKMUedit 01.png|550px]]<br/><br/> | ||
| + | |||
| + | [[Category:資訊處]] [[Category:圖書資訊處]] [[Category:資訊服務]] | ||
當前修訂版本
目錄 |
[編輯] 密碼變更後之注意事項
[編輯] 本校常用圖書資訊服務所對應之帳號及密碼
- 密碼變更後之注意事項
提醒您,變更電子郵件/校務資訊系統密碼之後,
如果您的電腦、行動裝置、行動 App(如︰i高醫),
或校外信箱 (設定收取本校信箱) 曾記憶過該密碼,
也要記得用新密碼重新登入。
- 本校圖資處所提供資訊服務,常用的有兩個密碼︰
- (A) 主要密碼︰電子郵件/校務資訊系統密碼
- (B) 次要密碼︰數位學習平台密碼
- 只要記得 (A) 主要密碼就可以重設次要密碼。
- 各項服務所需輸入之帳號與密碼,詳情請參考︰
- 簡要對照表
| 密碼類別 | 適用之系統 |
| (A) 主要密碼︰ 電子郵件/校務資訊系統密碼 | (1)電子郵件 (2)校務資訊系統 (3)授權軟體下載 (4)圖書館館藏查詢系統 (5) iKMU Wi-Fi (6) i高醫App |
| (B) 次要密碼︰ 數位學習平台密碼 | (1)數位學習平台 (2)電子資源查詢 |
[編輯] 如果忘記密碼
- 若您已在 MyKMU https://my.kmu.edu.tw 註冊過備用信箱並完成驗證,可使用 MyKMU 的忘記密碼功能。
- 若您未在 MyKMU 註冊過備用信箱,本人可於上班時間攜帶本校身份證件至國際學術研究大樓6F圖書資訊處,由工作人員協助處理,或與圖書資訊處網路技術組連絡 (信箱︰net@kmu.edu.tw,校內分機︰2184)。
[編輯] 忘記密碼(有設定備用信箱)(圖文版)
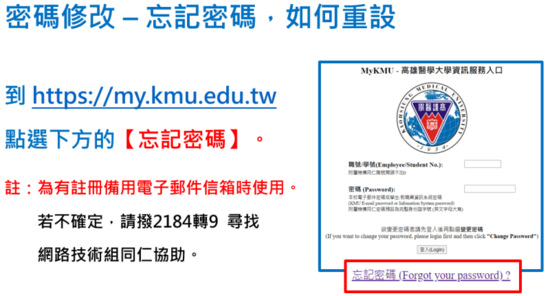
1.到 https://my.kmu.edu.tw點選下方的【忘記密碼】。
註:為有註冊備用電子郵件信箱時使用。
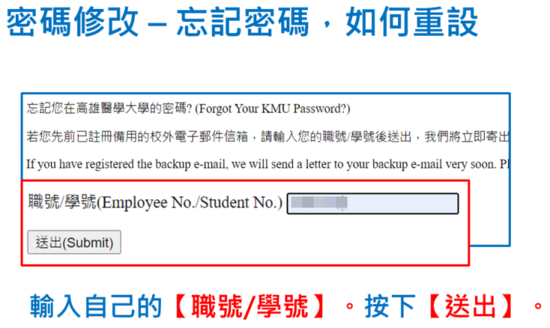
2.輸入自己的【職號/學號】。按下【送出】。
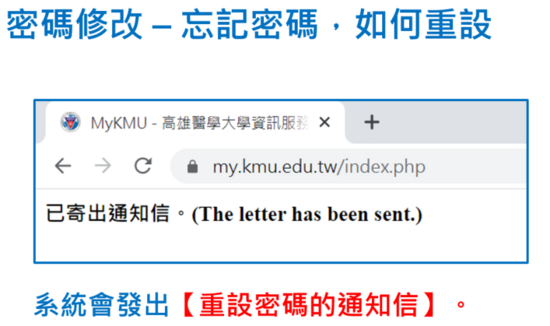
3.系統會發出【重設密碼的通知信】。
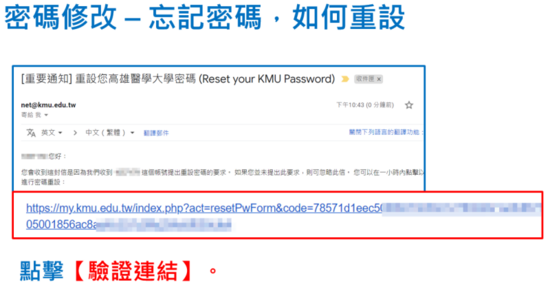
4.點擊【驗證連結】。
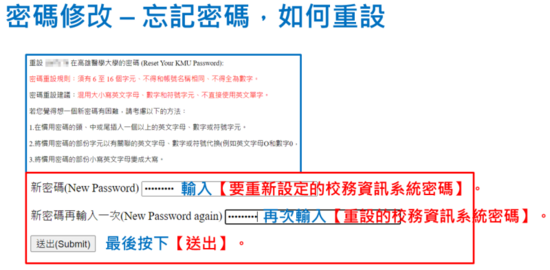
5.輸入【要重新設定的校務資訊系統密碼】。
再次輸入【重設的校務資訊系統密碼】。
最後按下【送出】。
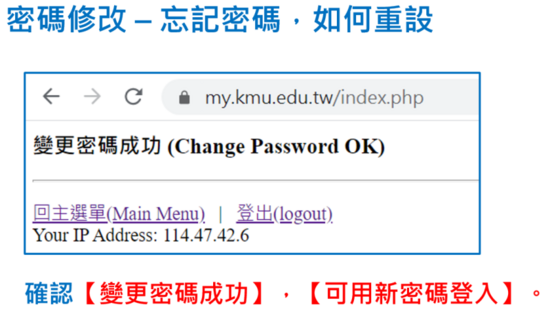
6.確認【變更密碼成功】,【可用新密碼登入】。
[編輯] 如何更新已記憶的相關密碼 (文字版)
- 更新 i高醫App 曾記憶過該密碼
- 登出再重新登入,輸入新的電子郵件/校務資訊系統密碼
- 更新校外信箱 (設定收取本校信箱) 曾記憶過該密碼
- 以 Gmail 為例︰
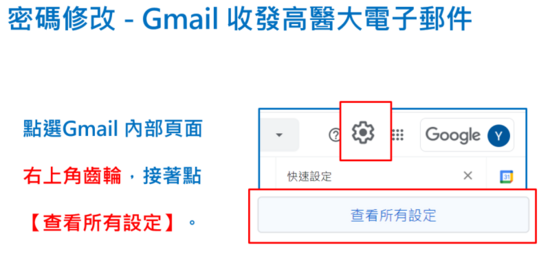
- 右上 設定(齒輪) -> 查看所有設定 ->
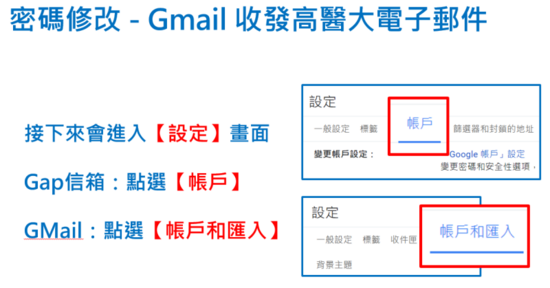
- 帳戶 -> 查看其他帳戶的郵件: ->
- 針對您設定的本校帳戶 修改資訊
- 輸入新的電子郵件/校務資訊系統密碼
