Windows 7 自動更新
出自KMU Wiki
(修訂版本間差異)
| 在2011年10月19日 (三) 12:22所做的修訂版本 (編輯) Jl (對話 | 貢獻) ←上一個 |
當前修訂版本 (2011年10月19日 (三) 17:06) (編輯) (撤銷) Jl (對話 | 貢獻) |
||
| (4個中途的修訂版本沒有顯示。) | |||
| 第1行: | 第1行: | ||
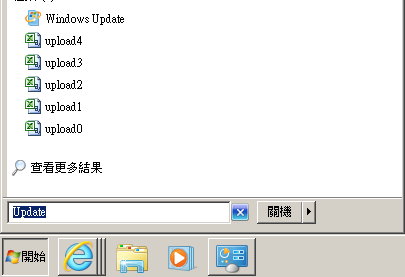
| + | 1.於Windows 7桌面視窗左下角按下[開始],並於[搜尋程式及檔案]輸入 " Update ",即出現Windows Update視窗.<br> | ||
| [[Image:Win7autoupdate1.jpg|圖像:Win7autoupdate1.jpg]]<br> | [[Image:Win7autoupdate1.jpg|圖像:Win7autoupdate1.jpg]]<br> | ||
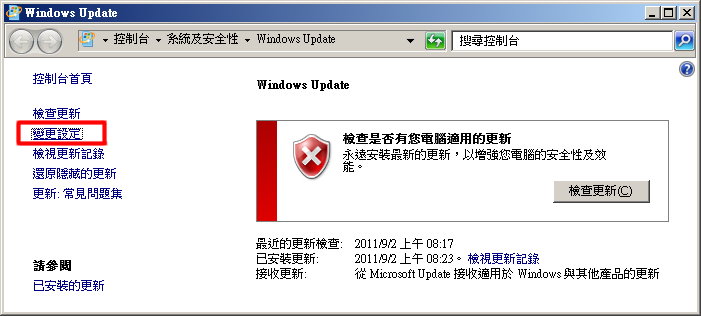
| - | [[Image:Win7autoupdate2.jpg|圖像:Win7autoupdate2.jpg]]<br>[[Image:Win7autoupdate4.jpg|圖像:Win7autoupdate4.jpg]]<br> | + | 2.點選左方 [ 變更設定 ]選項.<br> |
| + | [[Image:Win7autoupdate2.jpg|圖像:Win7autoupdate2.jpg]]<br> | ||
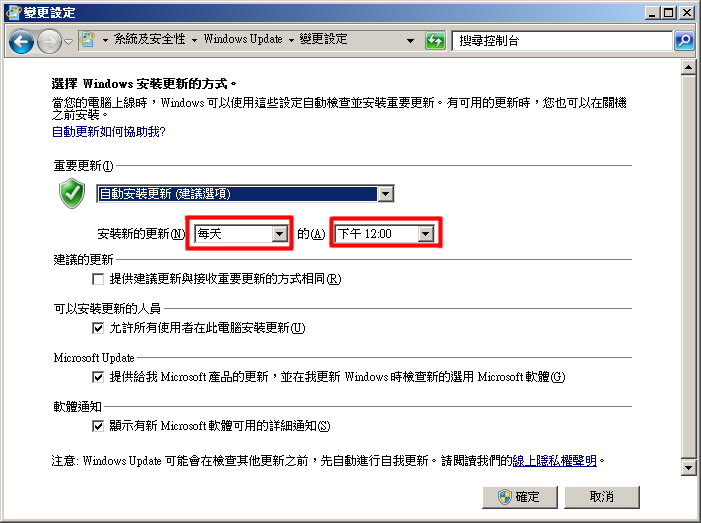
| + | 3.輸入自動更新的項目後,按下 [ 確定 ]即完成設定.<br> | ||
| + | [[Image:Win7autoupdate4.jpg|圖像:Win7autoupdate4.jpg]]<br> | ||
當前修訂版本
1.於Windows 7桌面視窗左下角按下[開始],並於[搜尋程式及檔案]輸入 " Update ",即出現Windows Update視窗.

2.點選左方 [ 變更設定 ]選項.

3.輸入自動更新的項目後,按下 [ 確定 ]即完成設定.

