如何安裝JMP Clinical / SAS
出自KMU Wiki
(修訂版本間差異)
| 在2022年2月17日 (四) 17:22所做的修訂版本 (編輯) Jeff (對話 | 貢獻) ←上一個 |
當前修訂版本 (2022年2月23日 (三) 14:40) (編輯) (撤銷) Jeff (對話 | 貢獻) |
||
| (14個中途的修訂版本沒有顯示。) | |||
| 第5行: | 第5行: | ||
| == JMP Clinical原廠安裝及說明手冊(請點選觀看操作手冊 [[Image:JMP Clinical setup manual.pdf]])。 == | == JMP Clinical原廠安裝及說明手冊(請點選觀看操作手冊 [[Image:JMP Clinical setup manual.pdf]])。 == | ||
| - | == 安裝步驟 == | + | == JMP Clinical/SAS 安裝步驟 == |
| - | # | + | # 請務必確認已經徹底刪除SAS步驟 |
| + | # 於全校授權軟體網站(https://fs.kmu.edu.tw)下載 JMP Clinical Academic Suite(SAS+JMP) 後,使用7-zip解壓縮 | ||
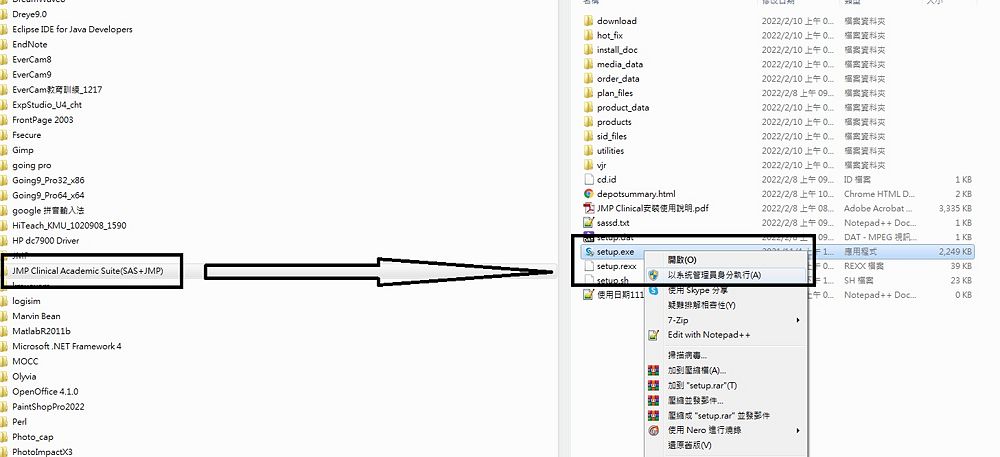
| # 在目錄"JMP Clinical Academic Suite(SAS+JMP)" 的 Setup.exe,按滑鼠右鍵後點選"以系統管理員執行" | # 在目錄"JMP Clinical Academic Suite(SAS+JMP)" 的 Setup.exe,按滑鼠右鍵後點選"以系統管理員執行" | ||
| ## [[Image:JMP Clinical Setup01.jpg|1000px]] | ## [[Image:JMP Clinical Setup01.jpg|1000px]] | ||
| 第12行: | 第13行: | ||
| + | == JMP Clinical/SAS 注意事項 == | ||
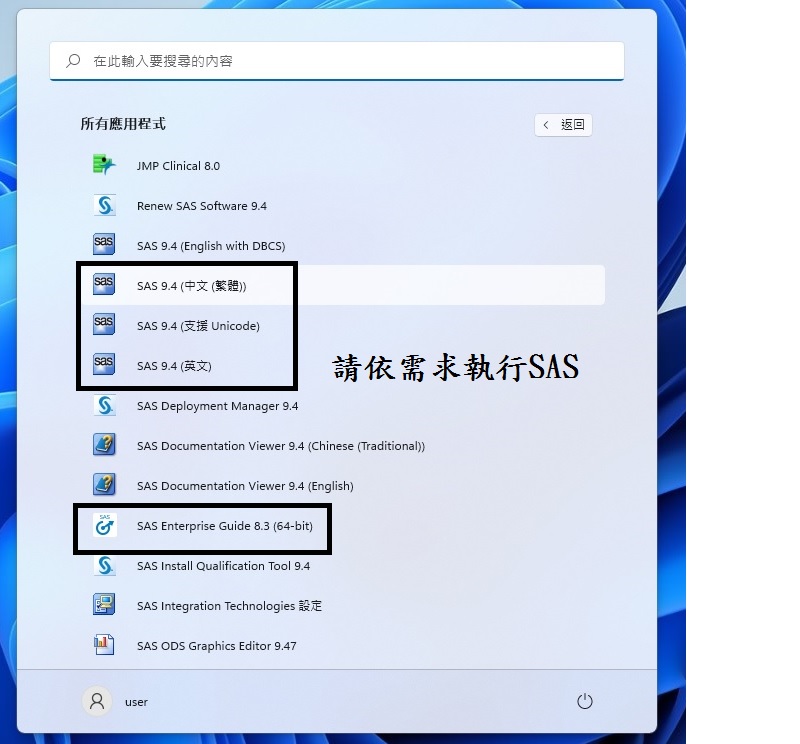
| + | #執行SAS,請點選需要項目即可 | ||
| + | ## [[Image:JMP Clinical Setup02.jpg|1000px]] | ||
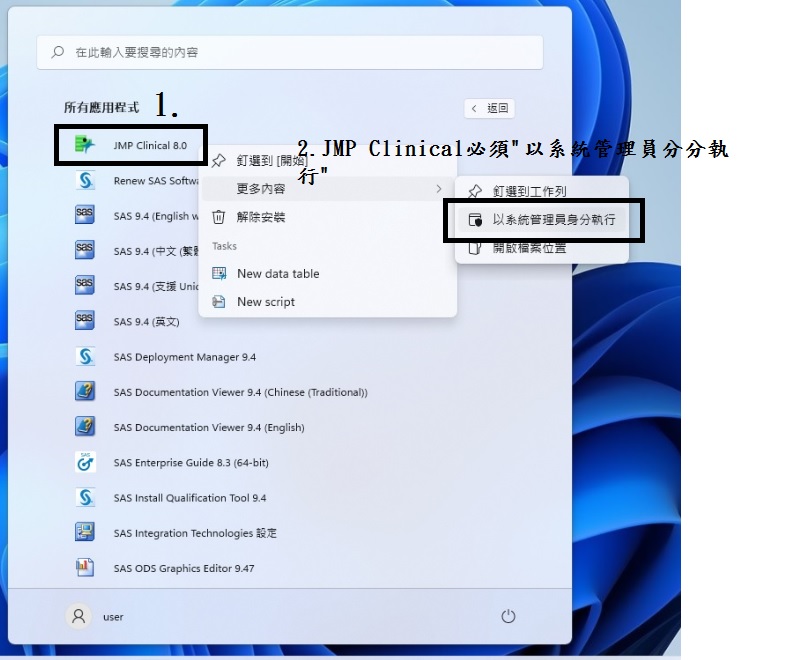
| + | #執行JMP Clinical,必須點選"以系統管理員執行",否則程式會閃退 | ||
| + | ## [[Image:JMP Clinical Setup03.jpg|1000px]] | ||
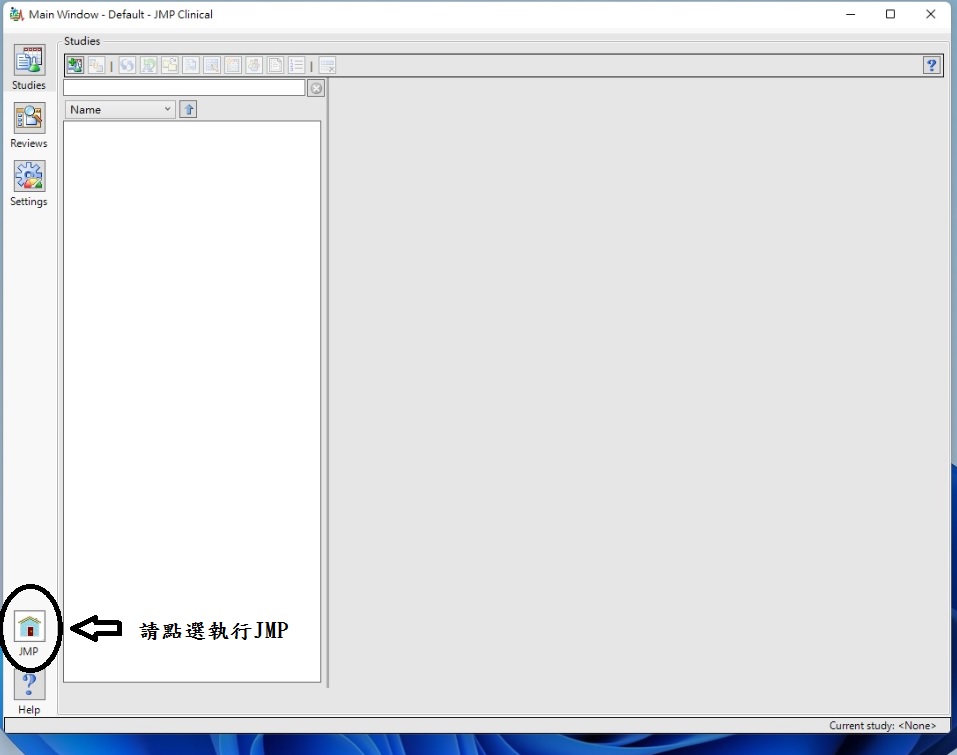
| + | #若要執行JMP需先執行JMP Clinical,然後點選左下方的"小房子"圖示 | ||
| + | ## [[Image:JMP Clinical Setup05.jpg|1000px]] | ||
| + | #JMP Clinical中的JMP統計分析模組少於JMP Pro,模組請參考上方模組功能 | ||
| + | ## [[Image:JMP Clinical Setup06.jpg|1000px]] | ||
| + | # JMP MP Clinical/SAS支援的作業系統 | ||
| + | ## Windows 11(JMP 16.1 及以上) | ||
| + | ## Windows 10 (Windows 10 S 模式除外) | ||
| + | ## Windows 8.1 (RT 版除外) | ||
| + | ## Windows 7 (RT 版除外) | ||
| + | ## Windows Server 2019 | ||
| + | ## Windows Server 2016 | ||
| + | ## Windows Server 2012 R2 | ||
| + | == JMP Pro 安裝步驟 == | ||
| + | # 請先於全校授權軟體網站(https://fs.kmu.edu.tw)下載 JMP Pro 後,使用7-zip解壓縮 | ||
| + | # JMP Pro可以不需移除舊版,可以使用sid_files目錄下的core file更新授權即可。 | ||
| + | # 雙擊"setup.exe" 後,其餘步驟請依畫面指示即可 | ||
| - | == 注意事項 == | + | |
| - | # | + | == JMP Pro 注意事項 == |
| + | # 安裝檔"setup.exe" 位於目錄\JMP\JMP ProXX.X Win\JMP\JMP_Pro\XX_X\Windows\ | ||
| + | 如下圖16.1版安裝檔位於目錄\JMP\JMP Pro16.1 Win\JMP\JMP_Pro\16_1\Windows\ | ||
| + | ## [[Image:JMP Clinical Setup04.jpg|1000px]] | ||
| + | # JMP Pro可不需移除舊版,可以使用sid_files目錄下的core file更新授權即可,但建議從控制台-程式和功能中,移除JMP Pro後,重新開機再安裝JMP Pro。 | ||
| + | # 移除舊版是為確保若JMP Pro差異過大可能會安裝不成功。 | ||
| + | # JMP Pro 16支援的作業系統 | ||
| + | ## Windows 11(JMP 16.1 及以上) | ||
| + | ## Windows 10 (Windows 10 S 模式除外) | ||
| + | ## Windows 8.1 (RT 版除外) | ||
| + | ## Windows Server 2019 | ||
| + | ## Windows Server 2016 | ||
| + | ## Windows Server 2012 R2 | ||
| + | # JMP Pro原廠說明網址 https://www.jmp.com/zh_tw/support/system-requirements.html | ||
| [[Category:圖書資訊處]] | [[Category:圖書資訊處]] | ||
| [[Category:資訊服務]] | [[Category:資訊服務]] | ||
| [[Category:資訊處]] | [[Category:資訊處]] | ||
當前修訂版本
※如何安裝JMP Clinical / SAS
目錄 |
[編輯] JMP Clinical內含JMP、SAS、JMP Clinical(請點選觀看模組功能 Image:JMP Clinical fuction.pdf)。
[編輯] JMP Clinical原廠安裝及說明手冊(請點選觀看操作手冊 Image:JMP Clinical setup manual.pdf)。
[編輯] JMP Clinical/SAS 安裝步驟
- 請務必確認已經徹底刪除SAS步驟
- 於全校授權軟體網站(https://fs.kmu.edu.tw)下載 JMP Clinical Academic Suite(SAS+JMP) 後,使用7-zip解壓縮
- 在目錄"JMP Clinical Academic Suite(SAS+JMP)" 的 Setup.exe,按滑鼠右鍵後點選"以系統管理員執行"
- 其餘步驟因為皆是默認預設選項,請參考 JMP Clinical原廠安裝及說明手冊 P7~P13
[編輯] JMP Clinical/SAS 注意事項
- 執行SAS,請點選需要項目即可
- 執行JMP Clinical,必須點選"以系統管理員執行",否則程式會閃退
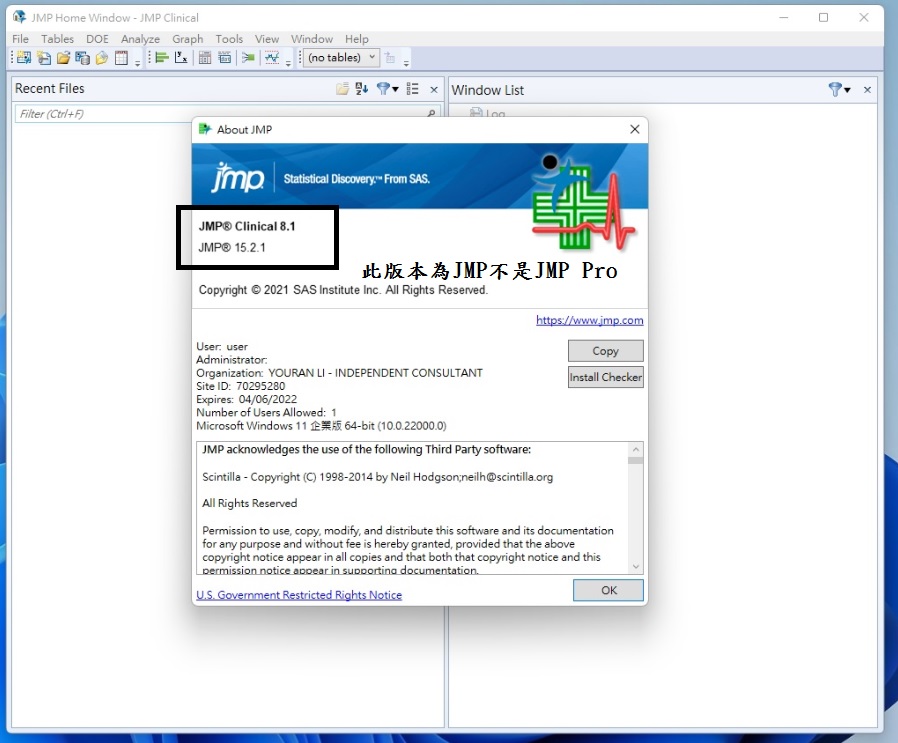
- 若要執行JMP需先執行JMP Clinical,然後點選左下方的"小房子"圖示
- JMP Clinical中的JMP統計分析模組少於JMP Pro,模組請參考上方模組功能
- JMP MP Clinical/SAS支援的作業系統
- Windows 11(JMP 16.1 及以上)
- Windows 10 (Windows 10 S 模式除外)
- Windows 8.1 (RT 版除外)
- Windows 7 (RT 版除外)
- Windows Server 2019
- Windows Server 2016
- Windows Server 2012 R2
[編輯] JMP Pro 安裝步驟
- 請先於全校授權軟體網站(https://fs.kmu.edu.tw)下載 JMP Pro 後,使用7-zip解壓縮
- JMP Pro可以不需移除舊版,可以使用sid_files目錄下的core file更新授權即可。
- 雙擊"setup.exe" 後,其餘步驟請依畫面指示即可
[編輯] JMP Pro 注意事項
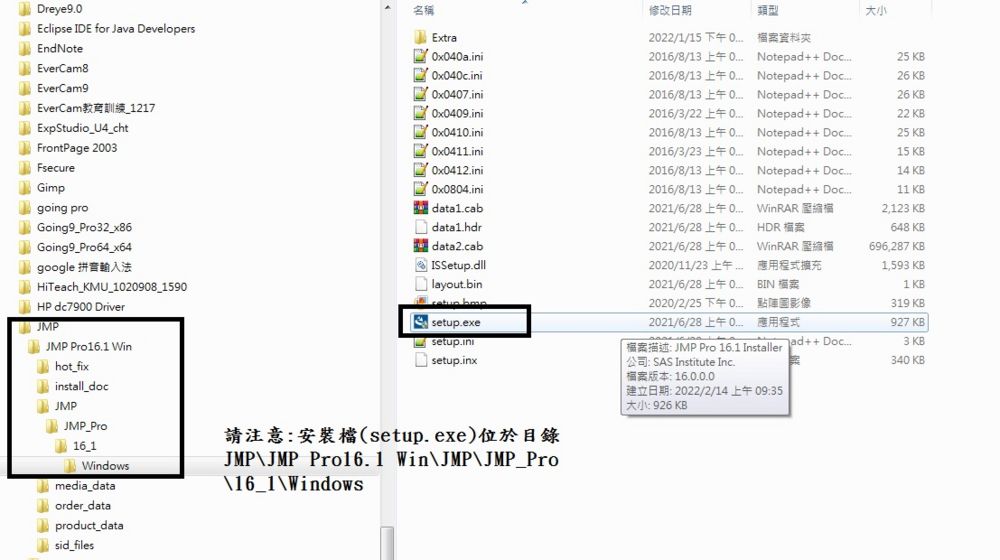
- 安裝檔"setup.exe" 位於目錄\JMP\JMP ProXX.X Win\JMP\JMP_Pro\XX_X\Windows\
如下圖16.1版安裝檔位於目錄\JMP\JMP Pro16.1 Win\JMP\JMP_Pro\16_1\Windows\
- JMP Pro可不需移除舊版,可以使用sid_files目錄下的core file更新授權即可,但建議從控制台-程式和功能中,移除JMP Pro後,重新開機再安裝JMP Pro。
- 移除舊版是為確保若JMP Pro差異過大可能會安裝不成功。
- JMP Pro 16支援的作業系統
- Windows 11(JMP 16.1 及以上)
- Windows 10 (Windows 10 S 模式除外)
- Windows 8.1 (RT 版除外)
- Windows Server 2019
- Windows Server 2016
- Windows Server 2012 R2
- JMP Pro原廠說明網址 https://www.jmp.com/zh_tw/support/system-requirements.html
